Projects
A very simple web server which hosted on a ESP32
What’s ESP32
The ESP32 is a popular microcontroller module that is widely used in the field of embedded systems and IoT (Internet of Things) development. It is part of the ESP (Espressif) series of microcontrollers and modules developed by Espressif Systems, a company based in China. The ESP32 is the successor to the ESP8266 module and offers several enhancements and additional features.
Key features of the ESP32 include:
- Dual-Core Processor: The ESP32 is equipped with two Tensilica LX6 microprocessor cores, which can be independently programmed and controlled. This dual-core architecture is useful for multitasking and handling complex tasks.
- Wireless Connectivity: The ESP32 supports various wireless communication protocols, including Wi-Fi and Bluetooth. This makes it suitable for a wide range of IoT applications that require wireless connectivity.
- Rich Set of I/O Pins: The ESP32 module has a significant number of GPIO (General-Purpose Input/Output) pins, which can be used to interface with sensors, displays, and other hardware components.
- Analog-to-Digital Conversion: It has multiple analog-to-digital converter (ADC) channels, allowing it to read analog sensor data.
- Built-in Security Features: The ESP32 includes hardware-based security features, such as support for secure boot, flash encryption, and cryptographic acceleration.
- Low Power Modes: The ESP32 can operate in low-power modes, which is essential for battery-powered IoT devices.
- Support for Various Development Frameworks: The ESP32 can be programmed using a variety of development environments, including the Arduino IDE, PlatformIO, and the Espressif IDF (IoT Development Framework).
- Cost-Effective: ESP32 modules are known for their affordability, making them a popular choice for both hobbyists and professional developers.
ESP32 modules are used in a wide range of applications, including home automation, smart appliances, industrial automation, wearable devices, robotics, and more. Their versatility, low power consumption, and connectivity options have made them a go-to choice for IoT and embedded system projects.
What’s a Web Server
A web server is a software application or hardware device that serves web content to clients over the internet or a local network. It plays a fundamental role in the World Wide Web, as it receives incoming requests from web clients (usually web browsers) and responds by delivering web pages, files, or other resources to be displayed or downloaded by the clients. In essence, a web server handles the “backend” part of web communication.
Key characteristics and functions of a web server include:
- Request Handling: It listens for incoming HTTP (Hypertext Transfer Protocol) requests from clients, which typically include web browsers. These requests can be for web pages, images, videos, scripts, or any other web-related content.
- Content Retrieval: The web server retrieves the requested content from its storage or from another server or application, depending on the configuration.
- Content Processing: It may perform various processing tasks on the content before serving it. For example, it might run server-side scripts (e.g., PHP, Python, or Node.js) to generate dynamic content.
- Response Generation: The web server generates an HTTP response containing the requested content. This response includes an HTTP status code indicating success or an error, along with metadata like content type, length, and other headers.
- Content Delivery: The response is sent back to the requesting client over the internet or local network. It is important to note that web servers don’t just serve HTML; they can serve various types of content, including images, videos, documents, and APIs.
- Security: Web servers often include security features to protect against various threats, such as DDoS attacks, injection attacks, and unauthorized access. Common security measures include firewalls, SSL/TLS encryption, and access controls.
- Concurrency and Scalability: Modern web servers are designed to handle multiple simultaneous connections efficiently. They can scale to support many users and high traffic loads.
- Logging and Monitoring: Web servers typically maintain access logs that record details of incoming requests. This information is useful for troubleshooting, performance analysis, and security auditing.
Common web server software includes Apache HTTP Server, Nginx, Microsoft Internet Information Services (IIS), and LiteSpeed, among others. Each of these web servers has its own strengths, configuration options, and use cases.
Web servers are a fundamental component of the internet and web technology, enabling users to access and interact with websites, web applications, and other online resources.
Setting up the development environment for ESP32
To set up the Arduino IDE for ESP32 development, follow these steps:
- Install the Arduino IDE:If you haven’t already installed the Arduino IDE, download and install it from the official Arduino website: https://www.arduino.cc/en/software
- Install ESP32 Board Support:To program ESP32 devices using the Arduino IDE, you need to install the ESP32 board support package. Here’s how to do it:
- Open the Arduino IDE.
- Go to “File” > “Preferences.”

- In the “Additional Boards Manager URLs” field, add the following URL:arduino
https://dl.espressif.com/dl/package_esp32_index.json

- Click “OK” to save the preferences.
- Go to “Tools” > “Board” > “Boards Manager.”

- In the “Boards Manager” window, search for “esp32” in the search bar.

- Click on “esp32” and click the “Install” button.

- Wait for the installation to complete.
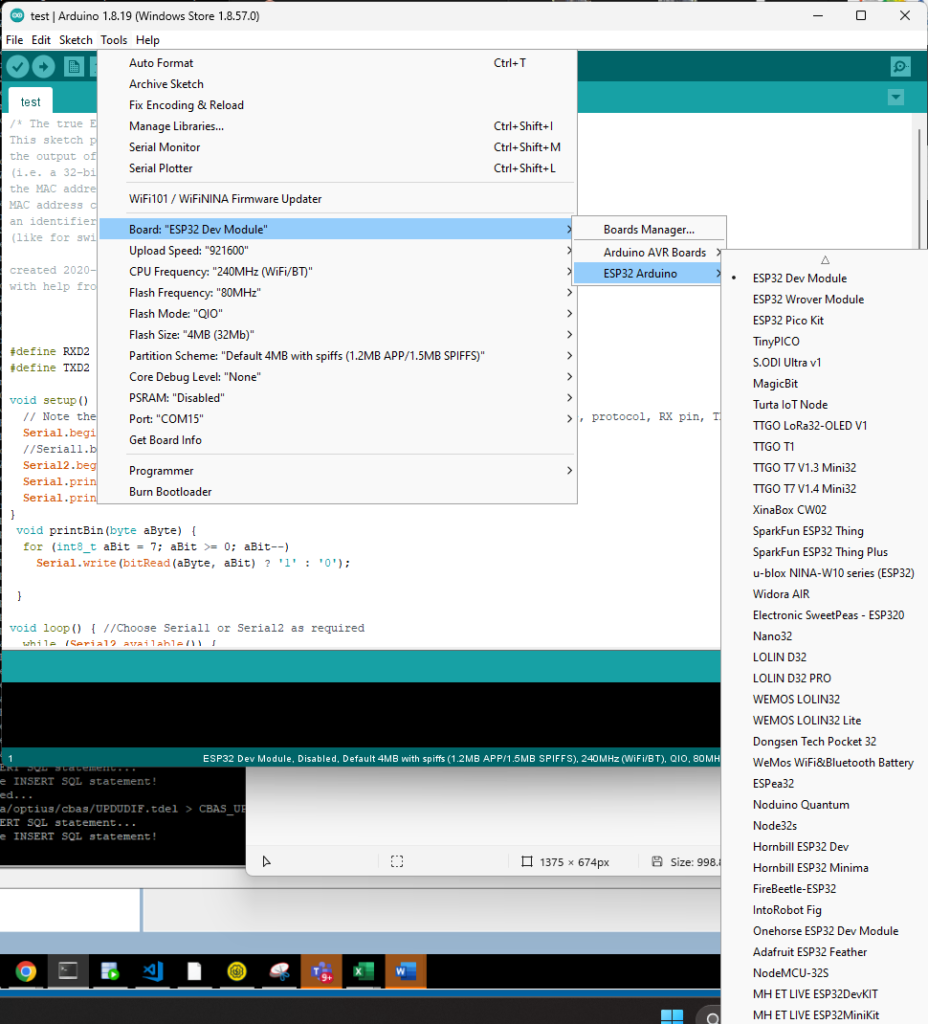
- Select the ESP32 Board:
- Go to “Tools” > “Board” and select the “ESP32 Dev Module” or the specific ESP32 board you are using.
- Set the COM Port:
- Go to “Tools” > “Port” and select the COM port associated with your ESP32 device. If you’re unsure which COM port to select, you can check it in the Windows Device Manager.
- Write and Upload Code:
- Now you can write your Arduino sketch and upload it to the ESP32 board just like you would with any other Arduino board.
- Monitor Output:
- You can monitor the serial output of your ESP32 by opening the Serial Monitor in the Arduino IDE. Go to “Tools” > “Serial Monitor.”
That’s it! You’ve set up the Arduino IDE for ESP32 development. You can start writing and uploading Arduino sketches to your ESP32 board. Be sure to consult the ESP32 Arduino Core documentation and example sketches for more information on programming and using ESP32 features:
ESP32 Arduino Core GitHub Repository: https://github.com/espressif/arduino-esp32
Arduino ESP32 Core Documentation: https://docs.espressif.com/projects/arduino-esp32/en/latest/
Set Board in the Arduino IDE